

₿itcoin Needs You!
Ask not what Bitcoin can do for you..
#1 Set up a node
Deploy a Full Node with our fool-proof step-by-step walkthrough and start helping decentralize Bitcoin today!
Requirements
The cheapest way to run a node is by using a mini computer. You can buy a pre-made device from Umbrel.com.
To save money you can also use a Raspberry Pi to make your own Umbrel (no skills required).
DIY:
1x Raspberry Pi 5 with 8GB RAM or more;
1x Raspberry Pi 5 power supply;
1x Passive or active cooling for the Raspberry Pi 5;
1x low voltage portable disk of 2TB or more;
1x UTP cable.
Get them on Amazon:
Raspberry Pi 5 + Power Supply & Active Cooling: 8GB RAM or 16GB RAM
Low voltage portable disk: 2TB or 4TB
UTP cable: Check available lengths
Got a Raspberry Pi 4 lying around?
A Raspberry Pi 4 has a lot less power than the Pi 5, but can still function as a Full Node. The use of additional apps on top of a Bitcoin Node like Lightning or Electrum may be limited with a Pi 4 compared to using the Pi 5.
Pi 4 users need to follow the steps below before proceeding to the Full Node installation steps:
1. Download Raspberry Pi Imager.
2. Insert the SD card into your PC using the included adapter.
3. In Imager, select your device. Under “Operating System,” select “Misc utility images” > “Bootloader” > “NVMe/USB Boot.” Under “Storage Device,” select your SD card and complete the process by clicking the “NEXT” button.
4. Once the SD card has finished flashing, insert it into the Raspberry Pi and connect it with a power supply to your wall outlet. After running for 20 seconds, you can unplug the Raspberry Pi.
Full Node installation steps:
Note for Raspberry Pi users:
An SD card is not required to install UmbrelOS. In some situations, an inserted SD card can cause problems while performing the steps below. Therefore, make sure there is no SD card in the Raspberry Pi before beginning.
Note for Umbrel Home users:
Power on your Umbrel device, connect a UTP-cable and skip the first 7 steps of the guide below.
1. Download the latest UmbrelOS for Raspberry Pi 4 or Raspberry Pi 5 on your PC.
2. Download and install Balena Etcher on your PC.
3. Connect the portable disk to your PC.
4. Open Balena Etcher and use it to “flash” the UmbrelOS image onto the portable disk.
5. Connect the portable disk to one of the USB 3.0 ports (blue port) on the Raspberry Pi.
6. Connect the Raspberry Pi to the internet using a UTP cable.
7. Power on the Raspberry Pi.
8. Almost done! Wait a few minutes for umbrelOS to boot. You can then open umbrelOS by going to http://umbrel.local, or by using the local IP address of the Raspberry Pi. This is only possible from devices that are connected to the same network.
Note: If accessing umbrelOS is difficult or very slow, this may be because the PC you’re using to access umbrelOS is configured for a public wifi network instead of a private network. Change your wifi network settings to private or connect your Raspberry Pi with a UTP cable.
9. After creating a password, click the blue App Store button at the bottom of the screen and install the ‘Bitcoin Knots’ app. After installation, the node will begin downloading the entire blockchain. Depending on your device’s capabilities and download speed, it will take 1 to 6 weeks to download the entire blockchain.
#2 Set your mempool policy
1. Click Settings at the bottom to adjust the settings: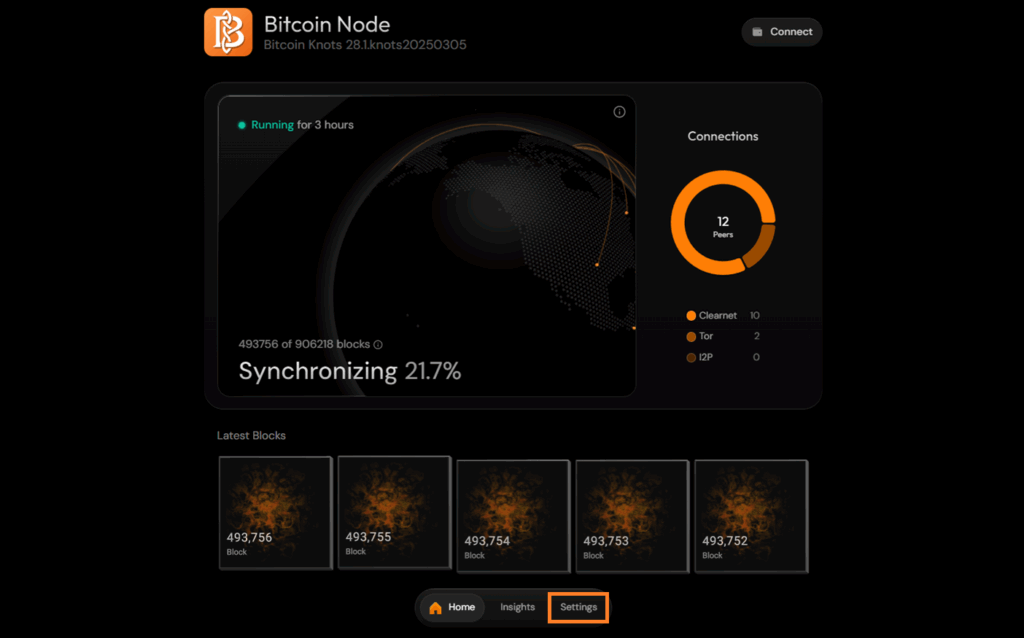
2. Before we begin, we will make the node anonymous ánd reachable for other nodes, to help them synchronize the blockchain.
Click Peer Settings. Go to the setting labeled Make All Outgoing Connections to Clearnet Peers Over Tor and enable it. Do the same for the setting labeled Incoming Connections by turning on the sliders next to Tor and I2P: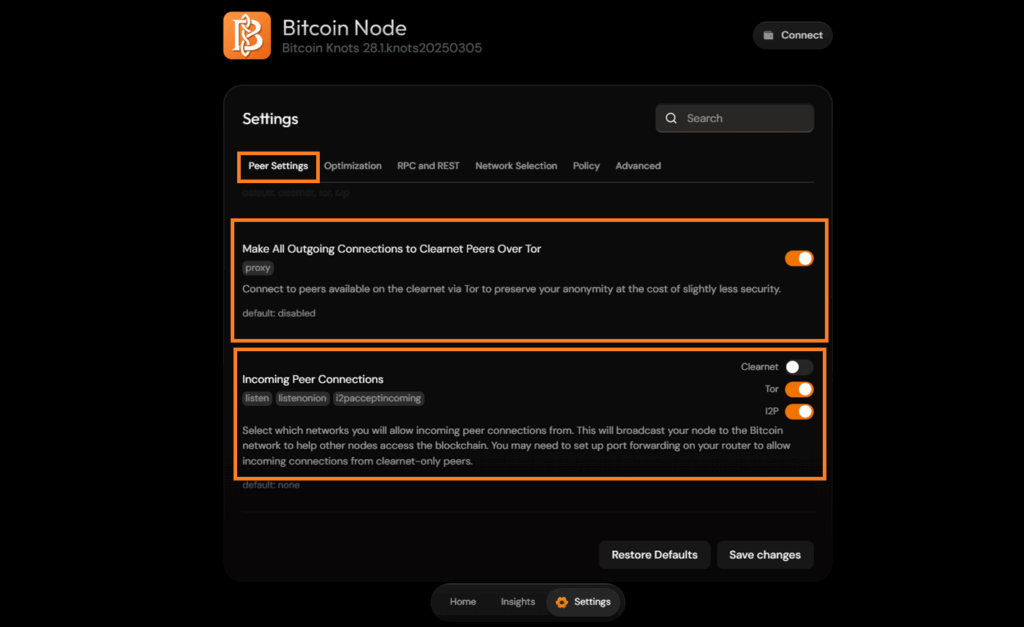
3. Click Policy.
– The setting Relay transaction with embedded data must be DISABLED to reject transactions with additional data/text.
– The setting Reject parasitic transactions must be ENABLED to reject NFT/Ordinal transactions.
– The Reject token transactions setting must be ENABLED to reject token swap transactions via Runes.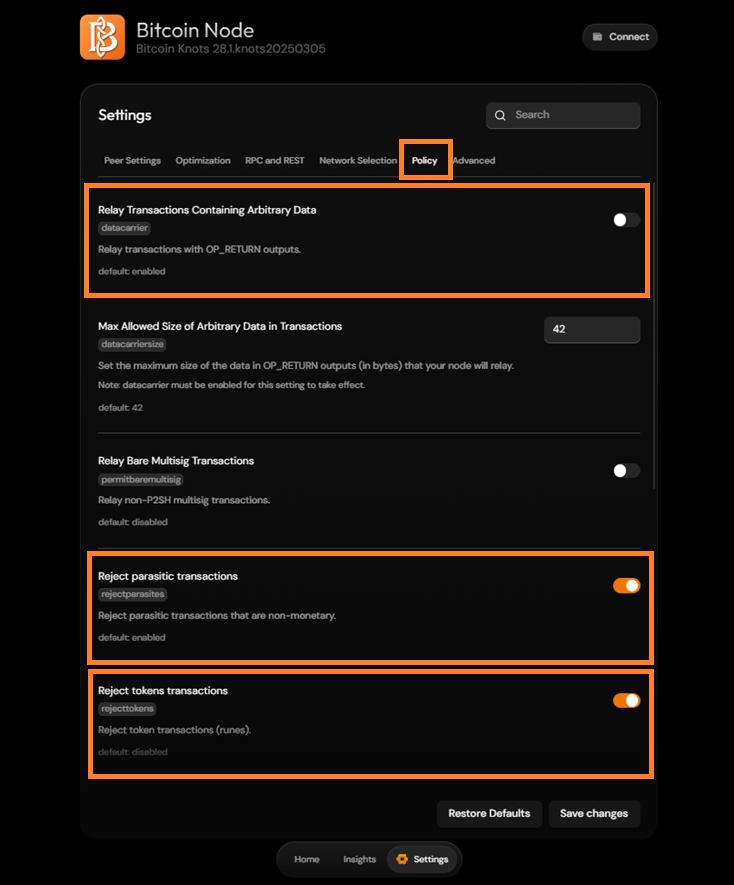
4. Click Save changes:
#3 Signal your support for BIP-110
To signal your support for the anti-spam Bitcoin Improvement Proposal 110 follow the steps below.
1. Click Settings:
2. Make sure your node is public by clicking Peer Settings to check if Incoming Peer Connections are enabled for Tor & I2P .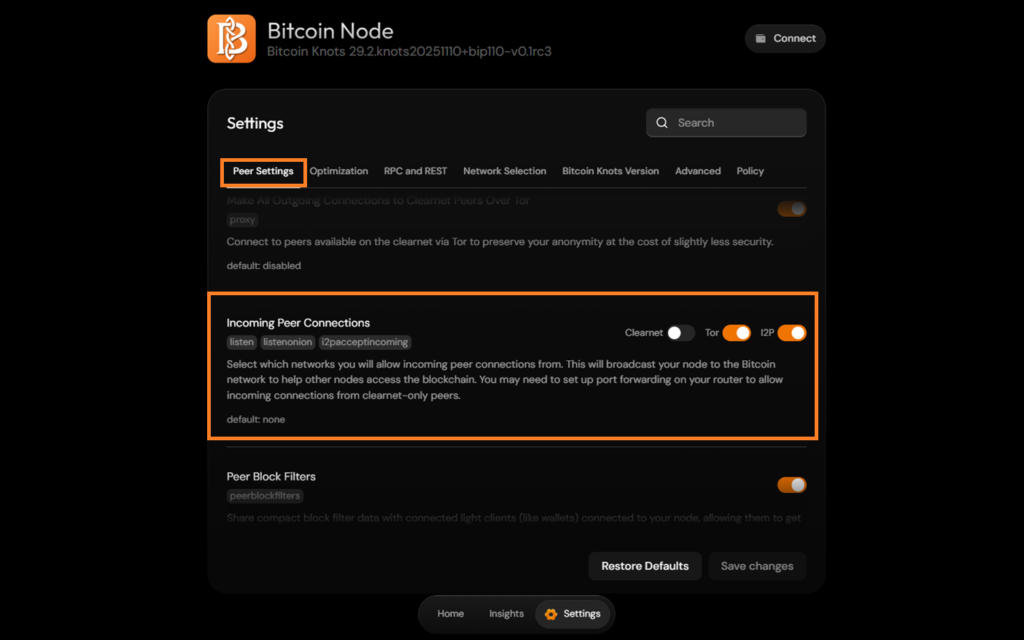
3. Click Bitcoin Knots Version, select BIP110 & click Save changes.
4. Confirm your support for BIP-110 by clicking Yes.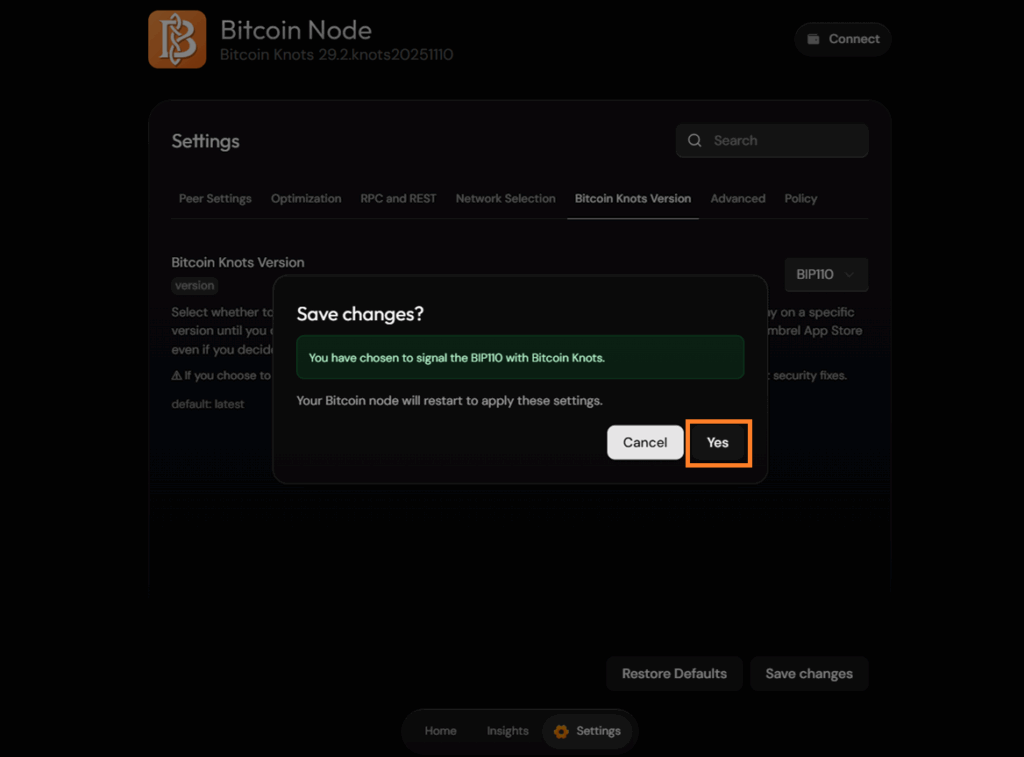
#4 Connect a wallet to your node
1. Enable the Transaction Indexing setting in your Bitcoin Knots node. You can find this by clicking Settings and then Optimization.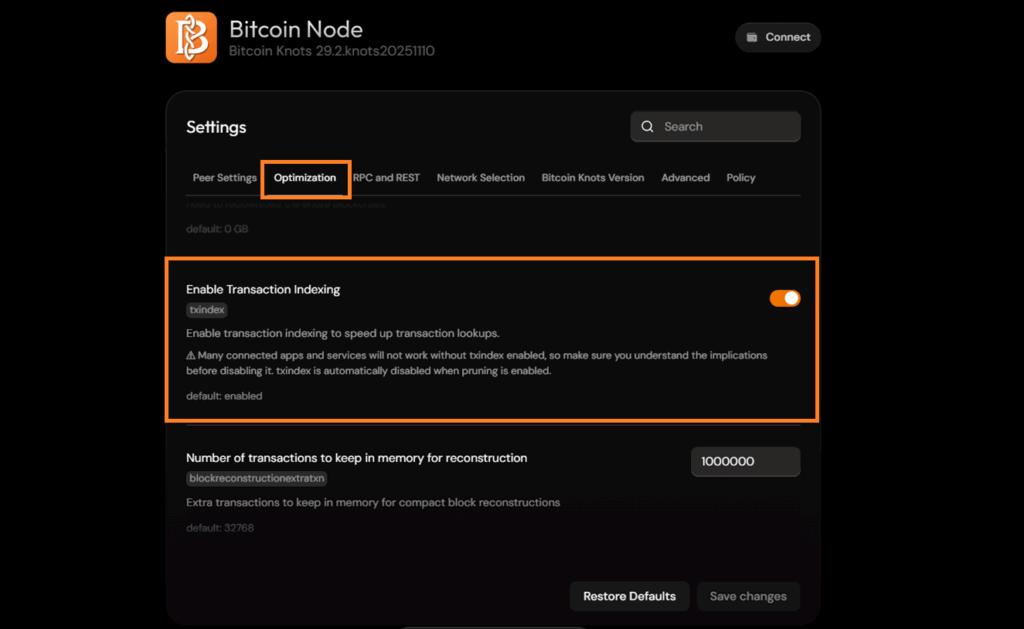
2. Once your Bitcoin Knots node is 100% synchronized, install the Electrs app from the Umbrel App Store. This app is required in most cases and acts as an additional database between your node and wallet. Wait until the Electrs database is 100% synchronized before continuing.
3. To connect your wallet to your node, you’ll need the local IP address of your Bitcoin node. You can find this at the top of the ‘Settings’ menu in your Umbrel.
4. The final step of connecting a wallet to your node varies by wallet provider. For up to date information, click on the name of your wallet provider: Trezor, Ledger, COLDCARD
Extra:
In the examples below, the local IP address of the Bitcoin Knots full node is 192.168.2.300. Because we’re using Knots, the default RPC port is 9332 instead of 8332. However, if you want to connect via the Electrum server of your Electrs app, the port is 50001.
Trezor: 192.168.2.300:50001:t
Ledger: 192.168.2.300:9332
COLDCARD: 192.168.2.300:9332
#5 Connect a miner to your node
Follow the steps below to connect your own miner(s) to your node. For more informatie on buying a cheap home miner please scroll down to the bottom of this page. For more information on how to rent miners to connect to your own node please check out RentSomeHash.com.
1. Enable the Coin Stats Index setting in your Bitcoin Knots node. You can find this by clicking Settings and then Optimization.
2. In the same Optimization menu you need to check if ‘blockreconstructionextratxnsize‘ is set to 1000000.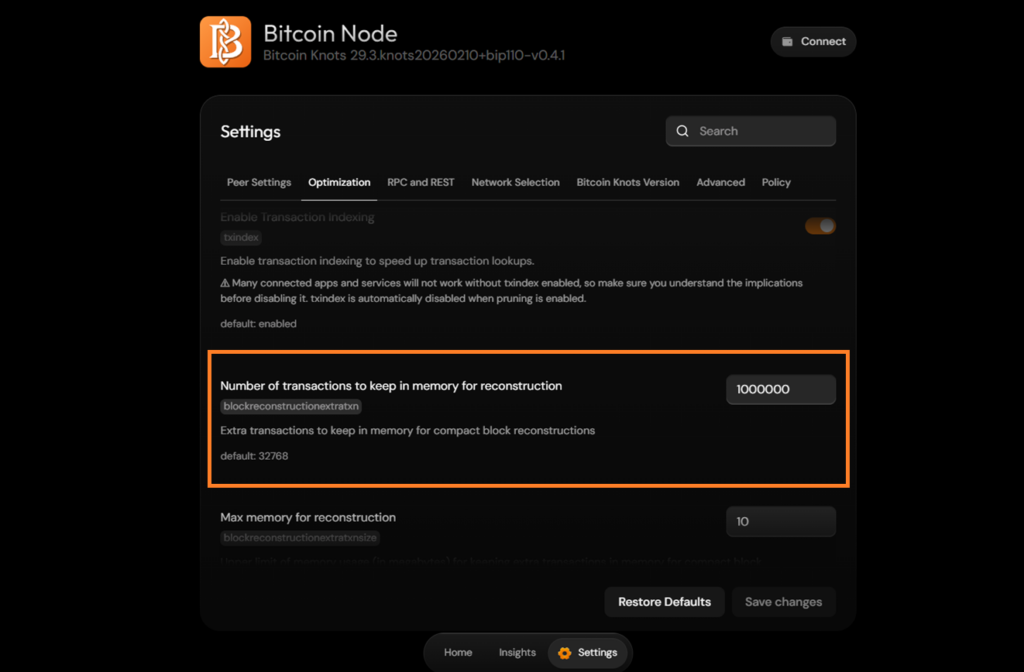
3. Make sure ‘maxmempool‘ is set to 1000.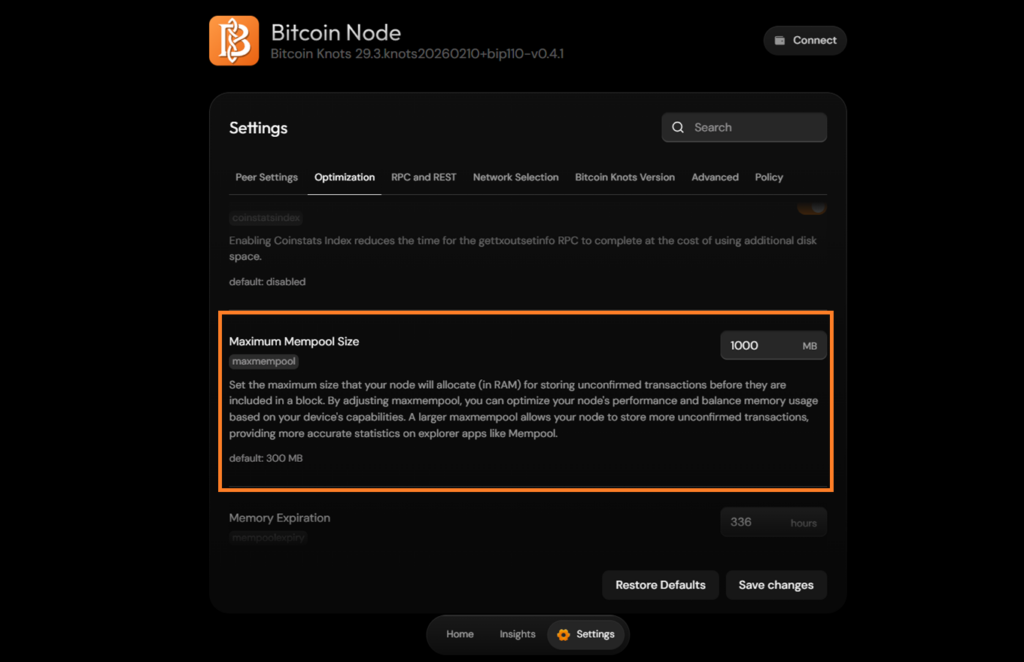
4. Go to the Umbrel App Store to install the DATUM mining app.
5. Once DATUM is installed, the app will take a minute or two to launch. Once the “NOT RUNNING” message disappears, you can launch the app. The system will provide you with a login, copy the username and password to a Notepad or Word file to use later on in this walkthrough.
6. Go to the Config page, add your personal BTC receiving adress and click save: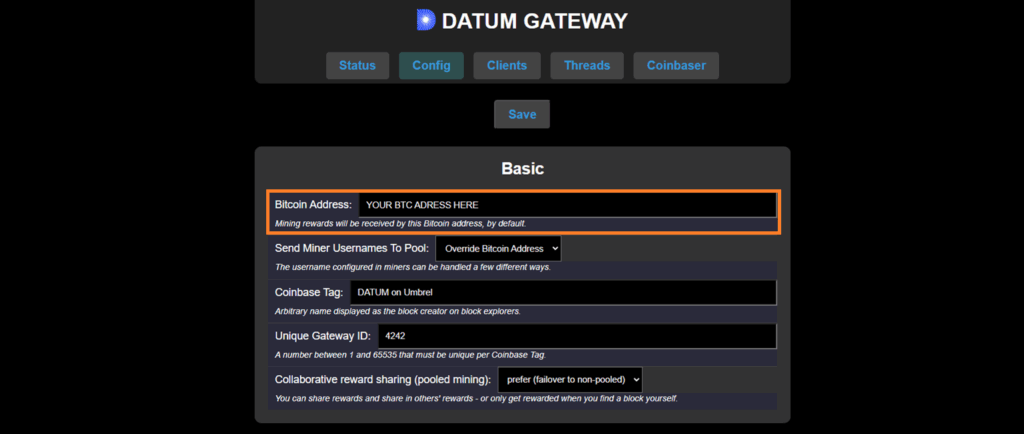
7. DATUM is now ready for use and is set by default to decentralized mining in the Ocean.xyz pool. For an overview of your pool mining statistics, look up your BTC receiving address on the statistics page: https://ocean.xyz/stats. To solo mine, two adjustments are required in DATUM’s settings (see step 7).
10. To connect a miner to your DATUM pool, enter the information below in your miner’s Pool-settings. To do this, you’ll need your Umbrel’s local IP address, which you can find in your Umbrel’s ‘Settings’ overview:
11. [OPTIONAL] To set DATUM to solo mining, select never (non-pooled mining only) under Collaborative reward sharing. After making your selection, press SAVE at the bottom of the CONFIG page, which will restart DATUM: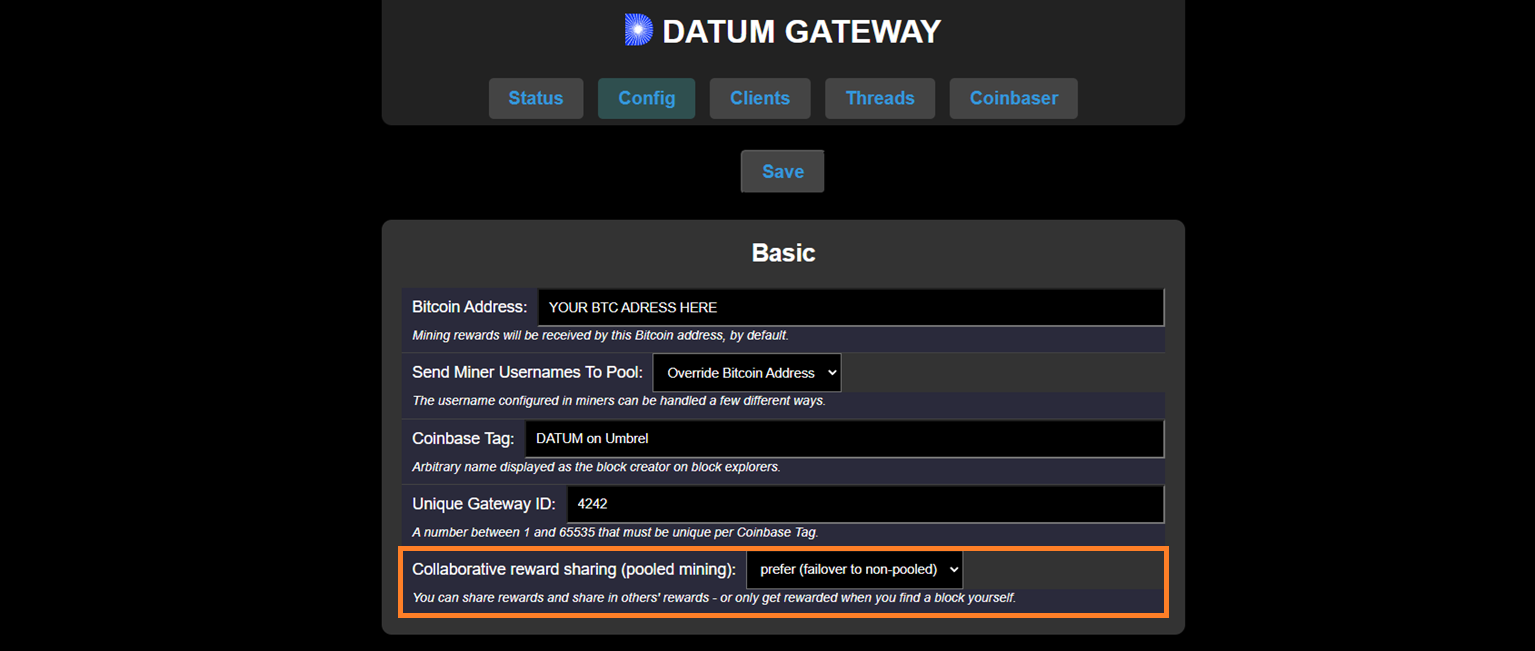
What is decentralization?
A network is decentralized when it uses a distributed infrastructure, where no central servers are used but instead consists of a large number of independent nodes that collectively monitor and manage the network.
For true decentralization, it’s also important that all nodes don’t use the same software. This creates an additional layer of decentralization within the network’s coding, with various developers jointly safeguarding the software’s integrity.
Why is decentralization important?
Decentralization is what makes Bitcoin unique and valuable. Without decentralization, Bitcoin would be nothing more than a standard database like that of any company or government. Without decentralization, the network could be taken over by a government or private party through legal or financial pressure. Therefore, it is vital for Bitcoin and its users that the network be as decentralized as possible.
Why is spam dangerous?
Much of the spam on the Bitcoin blockchain consists of harmless frog images, which are nothing more than annoying due to the unnecessary storage they require. Unfortunately, with the release of Core v30 it has become possible to fill blocks with 100kb images and videos. This makes it possible for malicious actors to post illegal content such as child pornography or state secrets, making it much easier for governments to ban Bitcoin in many countries.
More information about this threat and why even intelligence agencies may be trying to influence Bitcoin Core developers can be found in the following youtube videos: An Attack on Node Runners & Running Bitcoin Knots
Help Bitcoin!
You can play a role in Bitcoin’s decentralization by installing a so-called Bitcoin Full Node and keep it running 24/7. This can be done inexpensively, using a Raspberry Pi. On this page, you’ll find everything you need to install and configure a Bitcoin Knots full node & signal your support in the fight against spam. We’ll even help you connect a hardware wallet and miners to your node.
Various Bitcoin Node Software Clients:
BITCOIN CORE:
Development of this software was taken over by several members of the Bitcoin community from the creator of Bitcoin when he suddenly disappeared. Unfortunately, the team behind Core has since become very controversial, accused of modifying the Bitcoin code for their own gain. You can learn more about the controversy in one of the explainer videos created by Bitcoin Mechanic.
BITCOIN KNOTS:
(MOST DECENTRALIZATION OPTIONS)
An alternative to the controversial Core software is Knots. Knots aims at returning all the power to the end user, maximizing network decentralization. With Knots you can decide which type of transactions to allow and which to deny, giving you the power to filter out spam. This prevents the blockchain from becoming poisoned with bloat and illegal content.
LIBRA RELAY:
Finally, we’ll briefly discuss Libra Relay, specifically designed to turn a blind eye to spam on the Bitcoin network. It’s mainly used by people who don’t yet understand why spamming a monetary network is counterproductive or even destructive, and naively claim that stopping spam is “censorship.”
Cheap home miners
Get a chance to mine 3.125 BTC ($201,220.-) every 10 minutes, starting at $79.-!
GLOBAL SHIPPING by TinyChipHub.com (+5% discount)


![Bitaxe Hex [3+ TH/s] kopen](https://www.crypto-college.nl/wp-content/uploads/image-109-1024x576.png)
![Bitaxe SupraHex [4.2+ TH/s] kopen](https://www.crypto-college.nl/wp-content/uploads/image-111-1024x576.png)


